Quite a few people asked for step by step instructions on how to properly add player and staff faces into Football Manager 2009 and that’s why I decided to write this guide. I hope that it’s clear enough and easy to understand.
Step 1
Download a facepack of your choice. Let’s use one just for testing purposes, the Brazil facepack. Download it and you should have a file called Brazil.zip in your computer.
Step 2
Extract the contents of the zip file into the following folder
If you are using WindowsVista -> C:\Users\Your Account Name\Documents\Sports Interactive\Football Manager 2009\graphics\players\
If you are using Windows XP -> C:\Documents and Setting\Your Account Name\My Documents\Sports Interactive\Football Manager 2009\graphics\players\
If the graphics or players folders do not exist just create them like this:
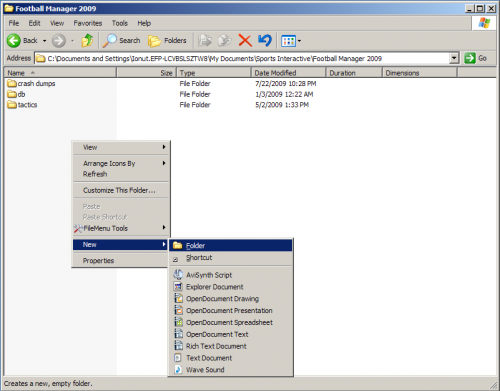
Go to the Football Manager 2009 folder in My Documents, right click in the Windows Explorer window and select New > Folder. A folder is created and you should name it with the appropriate name, «graphics» or «players».
Step 3
Open your Football Manager 2009 game.
Step 4
Go to Preferences, click on Display & Sound. Untick the box that says Use Skin Cache and tick the box that says Always Reload Skin on Confirm, like in the picture below.
Step 5
Click on «Confirm» and everything should be OK. Let me know if there are any problems, I’ll try to help you out.

FM 2022 Latest
-


FM 2022
/ 1 год agoBest English Wonderkids in FM23 | 10 Must-Sign Players
Throughout the past 10 years, English football has seen it’s youth teams develop into...
-


FM 2022
/ 1 год agoBest FM23 Coaches — Football Manager 2023 Coaches By Category
The best FM23 coaches are vital to success and the full development of your...
-


FM 2022
/ 2 года agoGateshead to Glory Season 8 — The European Debut
Welcome to a new episode of my FM 2022 story managing Gateshead from Vanarama...
-


FM 2022
/ 2 года agoGateshead to Glory Season 7 — Second Year in the EPL
Hi, welcome to a new episode of my Football Manager story managing Gateshead from...
-


FM 2022
/ 2 года agoGateshead to Glory Season 6 — Premier League Debut
Hi, welcome to a new episode of my Football Manager story managing Gateshead from...
-
FM 2022
/ 2 года agoFootball Manager Lower League Tactic Back to Back Promotions
Welcome to this Football Manager lower league tactic guide. Intro: Hi, I’ve been playing...
Свежие записи
Subscribe to our Newsletter
FM 2022 Player Lists
-


FM 2022
/ 1 год agoBest English Wonderkids in FM23 | 10 Must-Sign Players
Throughout the past 10 years, English football has seen it’s youth teams develop into...
-


FM 2022
/ 2 года agoBest FM22 Turkish Wonderkids | Golden Generation of Talent
Who are the FM22 Turkish Wonderkids? We’ve searched through the database in Football Manager...
-


FM 2022
/ 2 года agoBest FM22 English Wonderkids | 10 Outstanding Talents to sign
Who are the FM22 English Wonderkids? We’ve searched through the Football Manager 2022 Database...
-


FM 2022
/ 2 года agoBest FM22 Vanarama National League North & South Free Agents
Football Manager 2022 is here, and below you will find the best FM22 Vanarama...
-


FM 2022
/ 2 года agoThe 11 Best FM22 Argentine Wonderkids
Who are the FM22 Argentine Wonderkids? We’ve searched through the Football Manager 2022 Database...
-


FM 2022
/ 2 года ago11 of the Best FM22 Brazilian Wonderkids
Who are the FM22 Brazilian Wonderkids? We’ve searched through the Football Manager 2022 Database...


